How to Turn a Photo Into a Coloring Page: 4 Easy Methods
From AI-powered online tools to free desktop software — learn every method to convert any photo into a printable coloring page. Step-by-step instructions with tips for parents, teachers, and artists.
Coloring pages made from personal photos are far more engaging than generic clipart. A child colors their own pet, a student colors a famous landmark they studied, a family colors grandma's portrait — the personal connection makes it special. This guide covers every practical method, from free software to professional tools, so you can choose the approach that fits your time and skill level.
The methods below range from the effortless (30-second AI conversion) to the hands-on (manual Photoshop techniques). All result in a clean, printable black-and-white outline ready for coloring.
Method 1: Using an AI-Powered Online Converter
~30 seconds · Beginner · Free trial available
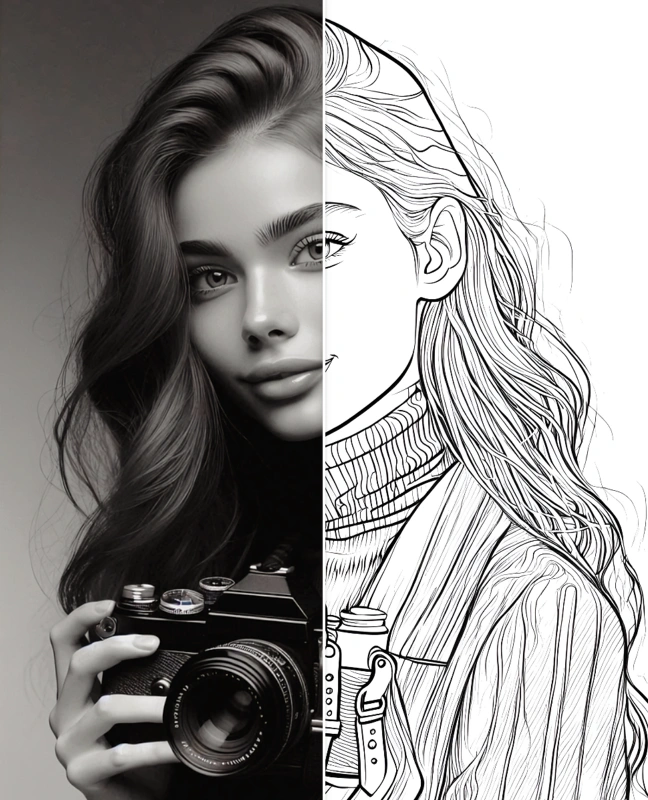
AI-based online converters are by far the easiest and quickest way to turn any photo into a clean coloring page. They analyze the image, extract edges, remove color, and apply different artistic styles — all automatically.
Step-by-step
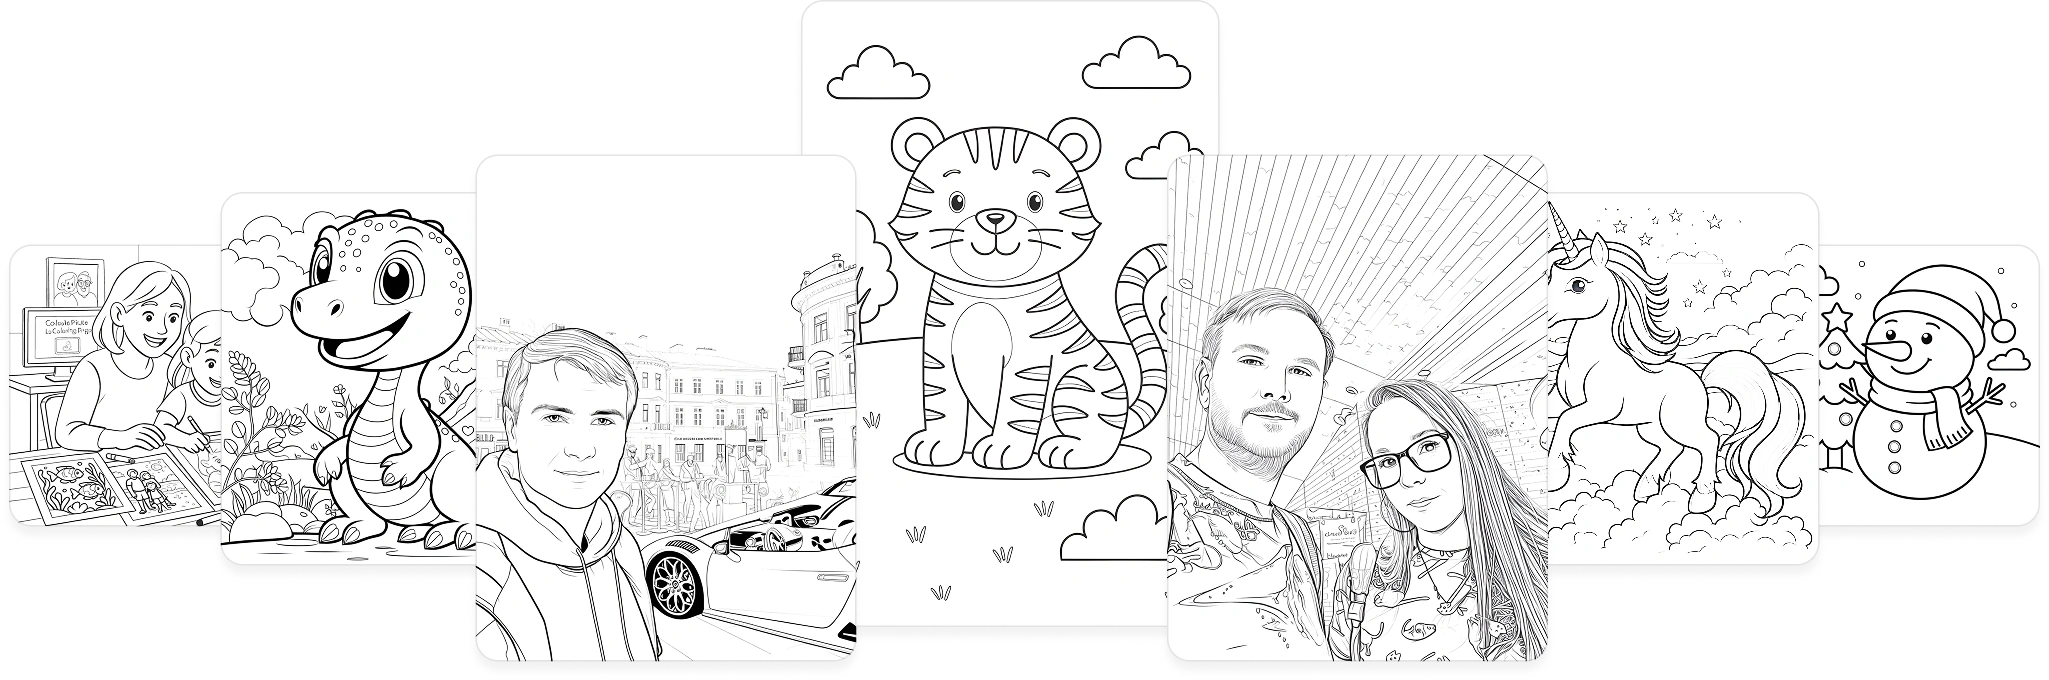
Pick from 6 styles: General, Detailed, Simplified, Anime, Sketch, or Comic — depending on your photo and who will be coloring.
Upload a .jpg or .png photo up to 20 MB. Clear, well-lit photos with a simple background give the best results.
The AI generates a printable coloring page in about 30 seconds. During peak hours it may take 2–3 minutes.
Download the coloring page as a high-resolution image and print it — or color it digitally.
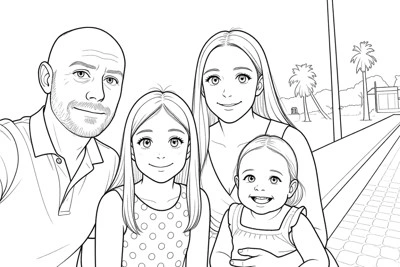
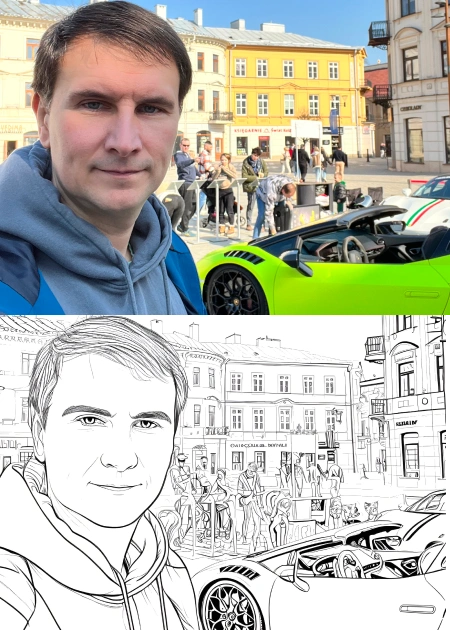
Examples: portrait, animal, and landscape photos converted to coloring pages
If you want the fastest result with multiple style options, try the Mimi Panda Photo to Coloring Page Converter. It supports portraits, animals, landscapes, food, architecture, and anime — and offers several levels of detail so you can match the result to the age and skill of the person who will be coloring.
Available Coloring Styles
General
A versatile all-purpose style that works well for portraits, animals, landscapes, and everyday objects.
Detailed (for adults)
Intricate lines and fine details. Best for adult coloring enthusiasts who enjoy complex, precise artwork.

Simplified (for kids)
Thick, bold outlines with minimal detail. Perfect for young children who are just learning to color.
Anime
Converts photos into anime and manga-style coloring pages with characteristic clean outlines.

Sketch
Artistic pencil sketch style that preserves the natural texture and feel of the original photo.

Comic
Bold comic book outlines. Great for vivid, expressive coloring pages inspired by graphic novel art.
Want to see all styles in action with your own photo? Open the Mimi Panda converter and try them for free.
Method 2: Using Adobe Photoshop
Photoshop gives you the most control over the final result. You can fine-tune line thickness, remove unwanted details, and adjust the level of complexity before printing.
Step-by-step in Photoshop
- Open your photo in Photoshop (File → Open).
- Duplicate the layer (Ctrl/Cmd + J) so you have a backup.
- Desaturate the duplicate layer: Image → Adjustments → Desaturate (Shift+Ctrl/Cmd+U).
- Duplicate the desaturated layer again. Set the top layer's blending mode to Divide.
- Invert the top layer: Image → Adjustments → Invert (Ctrl/Cmd+I). You'll see a white or near-white image.
- Apply Gaussian Blur to the top layer (Filter → Blur → Gaussian Blur). Increase the radius — around 10–20 px — until pencil-like lines appear.
- Flatten the image (Layer → Flatten Image) and adjust Levels (Ctrl/Cmd+L) to darken lines and brighten the white areas.
- Export as PDF or PNG for printing.
Method 3: Using GIMP (Free Alternative)
GIMP is a free, open-source image editor that can produce results similar to Photoshop. It's a great option if you don't have a Photoshop subscription.
Step-by-step in GIMP
- Open your photo in GIMP (File → Open).
- Convert to grayscale: Image → Mode → Grayscale.
- Duplicate the layer (Layer → Duplicate Layer).
- Invert the top layer: Colors → Invert.
- Set the top layer's blending mode to Dodge in the Layers panel.
- Apply Gaussian Blur to the top layer (Filters → Blur → Gaussian Blur). Adjust the radius until you see clean lines — start around 8–15 px.
- Flatten the image (Image → Flatten Image).
- Optionally, increase contrast: Colors → Brightness-Contrast to make lines crisper.
- Export as PNG or PDF: File → Export As.
Method 4: Using Procreate on iPad
Procreate is a professional illustration app for iPad. It gives artists precise control and produces very high-quality outlines — ideal if you want a custom, hand-crafted look.
Steps in Procreate
- Import your photo as a reference layer (Actions → Add → Insert a photo).
- Lower the reference layer opacity to around 30–40% so it's visible but not distracting.
- Create a new blank layer above it. Select a thin inking brush (Inking → Technical Pen works well).
- Manually trace the main outlines and important details of the photo using black ink on the new layer.
- When done, hide or delete the reference layer so only your traced outlines remain.
- Export as PDF (Actions → Share → PDF) for printing at full quality.
What Photos Work Best for Coloring Pages
Regardless of which method you choose, the quality of the output depends heavily on the input photo. Clear, well-lit photos with good contrast and distinct subjects produce the cleanest coloring pages.
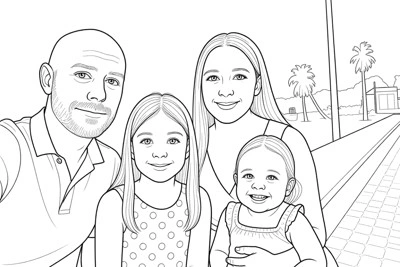
Portraits & Selfies
Clear portraits with even lighting and a simple background create detailed coloring pages with recognizable faces.
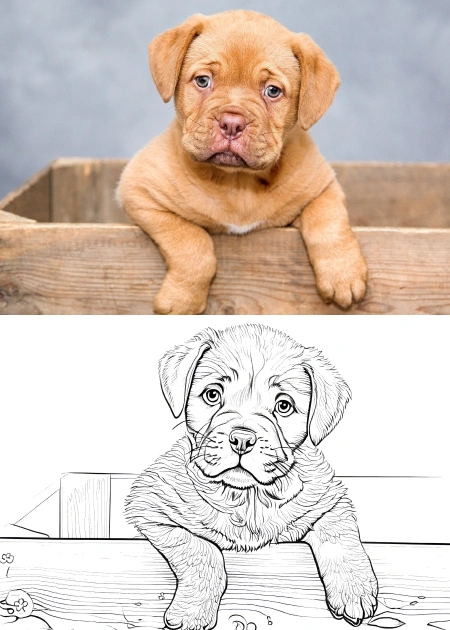
Pets & Animals
Photos of cats, dogs, or other animals work beautifully — especially when the animal fills most of the frame.
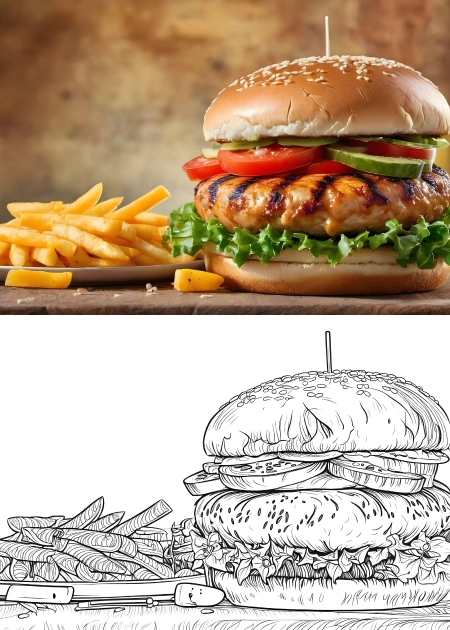
Food & Objects
Food, toys, and everyday objects with clear shapes and high contrast convert well to coloring sheets.
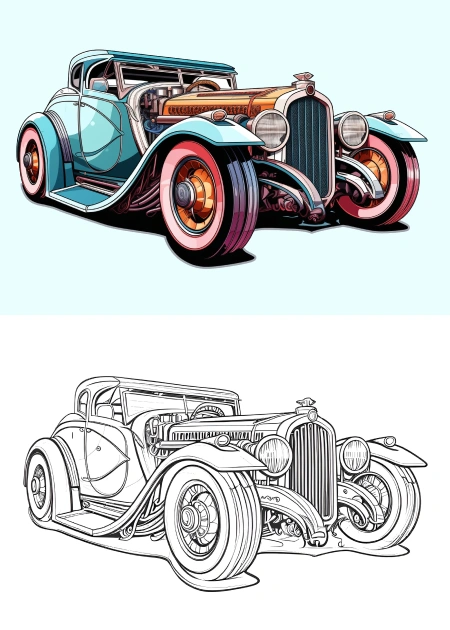
Vehicles
Cars, trucks, bikes — photos with clear edges and simple backgrounds produce great coloring pages for kids who love vehicles.
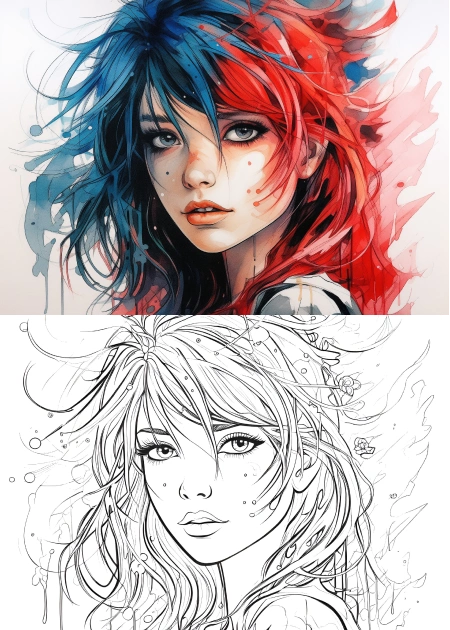
Anime & Illustrations
Already illustrated or anime-style images convert with excellent line quality, preserving the original character style.
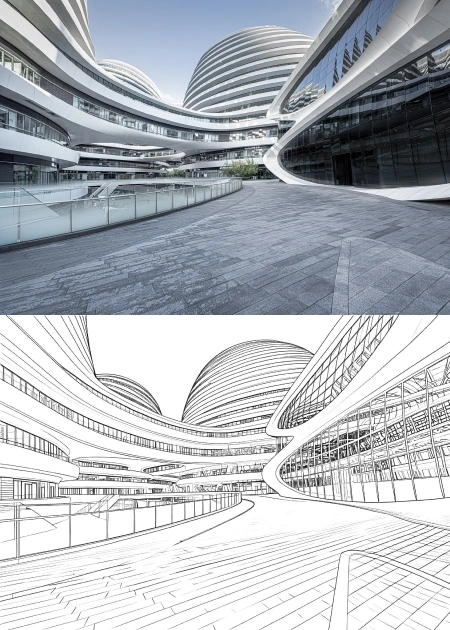
Architecture & Landscapes
Buildings, landmarks, and landscapes with strong geometric shapes create stunning, detail-rich coloring pages.
Photos to avoid
- Very dark or underexposed photos — lines become muddy
- Busy, cluttered backgrounds — the subject gets lost in noise
- Heavily blurred or out-of-focus images — no clear edges to trace
- Low-resolution screenshots — jagged pixels affect outline quality
Tips for Teachers & Parents
Classroom use
Convert a photo of a historical figure, local landmark, or scientific specimen for a lesson activity. Children engage more with coloring pages they recognize. Use the "Detailed" style for older students and "Simplified" for younger ones.
Custom coloring books
Create a set of 10–20 coloring pages from your child's favorite photos — family, pets, holidays — and print them as a personal coloring book. A unique and meaningful handmade gift.
Art therapy activities
Coloring familiar faces or beloved pets can be soothing. For therapeutic contexts, use the "Simplified" style so there are no overwhelming details, and print on heavier paper for a tactile experience.
Printing tips
Print on at least 90 g/m² paper to prevent marker bleed-through. For younger children, print at A4 size with thick lines. For detailed adult designs, A3 gives more room to color.
Preparing the photo
Before converting, crop your photo to focus on the main subject. Increase contrast slightly if the photo is flat. Remove distracting elements with your phone's editor. A clean input produces a clean coloring page.
Copyright reminder
Only convert photos you own or have rights to use. Personal photos are always safe. For classroom activities, use your own photos or properly licensed stock images.
What Our Users Say

I am completely delighted with the online transformation of a photo into a coloring page from the Mimi Panda service!! Turned a cherished family photo into a beautiful coloring project. The detail is stunning, and it made for a perfect personalized gift. Really highly recommend for anyone looking to add a personal touch to their coloring hobby!

I used Mimi Panda's online service for converting photos to paintings by numbers, and I am thrilled with the quality. The process was simple, and the result was a gorgeous paint-by-numbers canvas of my pet :) It was a fun, relaxing project that now hangs proudly in my living room. A fantastic service for art enthusiasts!
Excellent customer service. I wished to change my account from a Personal to Commercial subscription and I was allowed to transfer my images to my Commercial account. Fantastic customer service and such lovely images for colouring books. Thoroughly recommend.
These authentic reviews are sourced from Trustpilot, where our valued customers share their genuine experiences with Mimi Panda's services.